The repetitive motion of crafting is one of it's appeals to me. Pick up a simple task, get into the rhythm of working, lose myself for a while. It is meditation as my breathing slows to match the pace of hands. I feel my breathing slowing, and the world fades away into the color and texture of my work.
There are many crafty activities that can produce this meditative effect: hand quilting with it's steady rocker motion; simple knitting with it's needle in, yarn over, pull through, slip off; embroidery. Yet there are times when these projects do not lend themselves to the simple repetitive motion of a good medidative craft. When a project requires more attention.
At those times I turn my attention to beading a simple DNA chain. This is one of the first techniques you might learn in stringing beads; it's always repetitive, never requires much thought, yet always produces pretty results.
Let me show you how to do DNA beading.
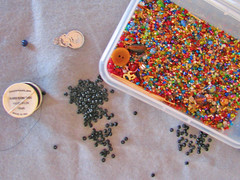
Begin with some simple beads, some beading thread and a beading needle. The chain has two elements: the spine and the chain. Spine beads slightly larger than the chain beads and often one color. In this example, I'm using a black "E" bead for the spine. The chain beads will be picked from my "bead soup" container. I'll alternate multi-colored and clear seed beads when constructing my chain. My favorite beading thread is silamide, a thin, strong nylon beading thread. These supplies can be found at most "big box" crafting stores and definitely at your local bead shop.
To begin, cut a length of beading thread about 24" long and thread your needle (this is usually the hardest part of the whole process). Because I never know exactly how I'll use the chain when it's completed, I tie an "odd" bead near the bottom to save thread that later will be tied to a closure.
Step one: Thread 3 of your spine beads onto the thread.
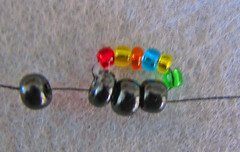
Step two: Choose a number of your chain beads and thread them onto your thread. The chain beads need to be slightly longer than the spine beads. In this example, 6 seed beads were used with the 3 spine beads.
Step three: Bring your needle down to the first spine bead (the one furthest away from the chain beads) and slide the needle up through all 3 beads.
Step four: While the needle is still inside the 3 spine beads, slide another spine bead over the tip and onto the spine.
Step five: pull the thread through, snugging the chain beads up to the spine beads.
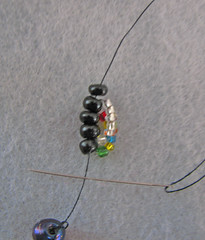
Repeat from step two, bringing your needle down 3 spine beads, and adding a new spine bead.
Snug the new chain up against the old chain.
That's it. Fast, simple, little thought. Purely meditative.
You will want to make sure that as you progress the chains nest nicely next to the previous chain. As the work progresses, the chain will spiral around the spine beads. This is why this known as DNA beading.

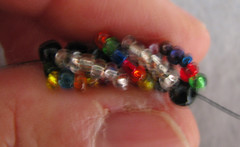
Depending on the beads you choose, you piece can be simple and monochromatic, or more colorful. As you choose to mix different sized beads in the chain, the look also becomes a bit more complex while the action of making it remains simple.
Other Beading Tutorials Online:
Made By Hand.By ME's Desiree Savarese shares how to make a Multi-Strand Seed Bead Necklace.
As a resource for her jewelry making class at IWCC, L. Kvigne post a tutorial for your basic Clasp Bracelet 101 and a Simple Dangle Earring.
Shiny Little Thingspointed we readers to a gorgeous Blossom Vine Knotted Necklace with instructions shared at Ornamentea.com.
Photo credits: from Debra Roby's Flickr Stream.
I also blog at: Weight for Deb and BlogHer on Wednesdays and Saturdays.


No comments:
Post a Comment